INSTALLATION GUIDES
Ventura Deluxe 1.4 Roof Top Tent - Instruction Manual PDF
Extended Ventura Deluxe 1.4 Roof Top Tent + Annex - Instruction Manual PDF
Ventura XL Aluminium Clamshell Roof Top Tent - Instruction Manual PDF
Ventura XL Hardshell Roof Top Tent - Instruction Manual PDF
3 Important Key Steps PDF
Ventura Awning - Instruction Manual PDF
WILL A VENTURA ROOF TENT WORK WITH MY VEHICLE?
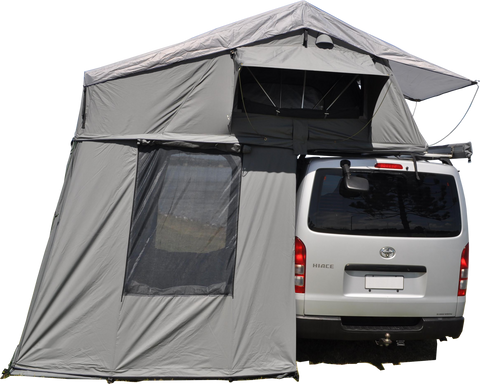
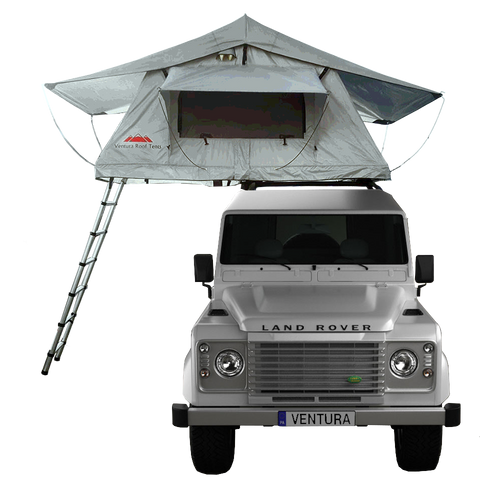
Our Ventura Roof Top Tents are universal and suitable 4x4s, small cars, vans, pickups and trailers. The roof tent can be deployed to the side, back or even over the bonnet. As long as you have either a set of roof bars or a roof rack then our roof tent can mount on top of your vehicle.


Cross Bars
Two cross bars is all you need, ideally between 80CM - 1M apart.
Cross bars run side to side across your vehicle's roof. Cross bars are available for most vehicles. The Ventura Deluxe 1.4 Roof Top Tents weigh Approx 48kg, most roof bars have a load rating between 60kg-100kg.


Your vehicle will have one of these four ways to attach cross bars
![]()
There are several online retailers who supply bars for all vehicles. We can also supply cross bars for you if this is needed. If you would like a quote for these please click here to send us an email.
Open rail - Your vehicle has side rails which run from the front to rear of the roof, and will have a gap between the roof and the rail, usually large enough to fit your fingers through.
Closed or flush rail - Similar to open rails, but without the gap. The rail will be touching the car roof along its entire length.
Fixed point - Your vehicle has no pre-fitted side rails, but has removable or sliding tabs, which reveal a screw fixing hole. The fixing points will be on the roof, front and back, and on both sides of the car.
Normal roof - Your vehicle has no rails of fixing points on the roof. Bars for "normal roof" cars fit to the door openings. Sometimes cars have a location hole, which can be seen when the door is open. Some 3 door models allow for the rear bars to fit to the edge of the rear window, but some will require both bars to clamp on the front door opening, meaning the gap between bars may be quite small. If this is the case will be indicate the distance.
Roof Racks
If you are purchasing an expedition/overland style full length Roof Rack. We recommend purchasing a flat roof rack which enables the roof tent to be mounted on either to the front, side or back.

Basket style roof racks or roof trays may need a special modified installation. If you have one of these below please contact us for help here.

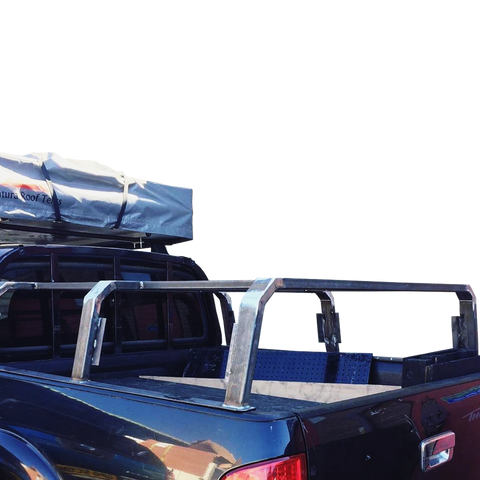
Pick up canopies, Bed Racks & Bars
Our roof tents are perfectly suitable for pick ups, you can either mount the roof tent onto mountain top bars, bed racks or an aluminium canopy. If you choose to have an annex with your roof tent, we would recommend a bed rack or aluminium canopy because it will be the same height as the cab. The annex is designed to flare out and get much wider as it reaches the ground.


Vehicle Load Ratings
Cross bars are bolted to the steel frame of your car, so the weight of the Ventura Roof Tent is distributed evenly.
It is important to check that your vehicle roof load limit is higher than the weight of the Roof Tent which you’re purchasing.
Commonly most roof bars have a load rating between 60kg-100kg, this is a dynamic weight limit which only applies when you are driving, the roof tent weighs 48kg which is under the load rating of all roof bars.

Roof Tent Weight Limit Explained
One of the most common questions we get asked is "will the tent support my weight?" When you are parked up and have the roof tent fully set up, it has a weight capacity of 250KG. The frame cantilevers open, the ladder supports part load of the overhanging section and the base aluminium panel is supported by the 4 brackets that slide on the mounting channels.
The dynamic load rating only applies when you are driving, The steel frame of your vehicle, which the Ventura Roof Tent sits on, can take hundreds of kilograms of force. This is known as the static weight limit.


Mounting Ventura Roof Tents to your cross bars or roof rack.

After un-boxing your new roof tent, look inside on the mattress and you will see 2 mounting channels, ladder, fixing kit, poles and if you have ordered the annex, that will be inside as well.
Once the tent is closed back up turn it over to reveal the 4 pre drilled holes on the base.
Line the mounting channels up with the pre drilled holes and then insert the nut through both the base of the tent and the mounting channel.
Please make sure the washer has been put on the nut before pushing it through the hole on the base.

Once these have all lined up and the nut has been pushed through you will then need to slide the bolt along the channel until it lines up to the nut and can be tightened.


Repeat this process until all 4 bolts have been tightened fully.

Now it's time to add the ladder.
Flip the roof tent so the top is facing up and you will see 4 more pre drilled holes. 
Push the nut through the hole and the ladder bracket. (again please make sure that the washer has been added first).

Add the washer and then tighten the bolt. Repeat this process until all 4 bolts have been tightened fully.

Place the ladder on to the top of the roof tent and line the ladder up with the bracket making sure that all holes line up. Push the nut through the bracket and the ladder.
Please make sure the washer has been added before doing this.
Tighten the nut but NOT fully. This helps the ladder move freely to help with the leverage when opening and if the nut is tightened fully the ladder will not be able to move.
Repeat this process until both bolts have been tightened.


In the fixing kit you will see 8 metal sliders and 8 bigger nuts. Push the nut through the slider repeat this process 8 times.
Lift your roof tent on top of your vehicle (you may need help with this)
Slide the Sliders along the mounting channel so that the bolts are positioned either side of the roof bar/roof rack structure.


In the fixing kit you will find 4 steel plates.
Once you are happy with the position of your roof tent, use the metal plates provided and line the holes up with the drop down nuts.
Tighten the nut fully until secure.


In the Fixing kit will be 4 rubber ends. Push these on the end of the mounting channel until flush. (you may need a mallet for this)
Opening the tent

Our roof tents feature an assisted opening mechanism, making set up incredibly fast and easy. One man operation allows it to fold out in seconds to full height. The roof tent attaches to 4x4s, small cars, vans, pick ups and trailers on roof bars or a roof rack. When you have it packed up, it's covered by a UPVC, heavy duty waterproof cover which is sealed/zipped all around.
This is a brilliant addition to your vehicle, very well wrapped and boxed for a safe delivery.
Adventure Time!!
Now you are all set and ready to go exploring.